Saturday, July 7, 2012

The Flavour of Indian Summers

From 


Come Summer, and all I can think of is sweet, sweet, juicy mangoes. I love mangoes of all shapes and sizes. And every summer is spent making the sweet chunda (sweet raw mango pickle) or the tangy kairi achaar (the tangy raw mango pickle), the thick and lovely aamras from the alphonsos and kesars, the sweet, sour and minty aam panha and in devouring those fresh fruits themselves. Every single year, this is the only thing that makes Indian summers bearable. :P

I know that summer is long gone and the monsoons have captured us now. But, it isn't yet too late for one amazing mango dish that you can create with the last of the mangoes still available in the markets. THE Mango Cheesecake!


I baked this very basic baked, eggless and gelatin-less cheesecake with mango and it turned out to be the best mango dish I've ever made! :D


Preparation time: 15-20 mins
Baking time: 30-35 mins
Serves: 1 (If you're like me) and 6, if you are normal people.

Ingredients:

1 packet Digestive buiscuits (Hobnobs are my favourites)
1/3 cup melted butter
2 tbsp powdered sugar
------------
1 large, ripe mango - cut in medium sized pieces
350 gms cream cheese (at room temperature)
2 tsp corn starch
1/2-3/4 cups powdered sugar
1/2 tsp cardamom powder (optional)
Mint leaves and mango slices for garnishing

Method:
  • Preheat the oven at 200 degrees Celsius for 10-15 minutes.
  • Press down the crushed biscuits firmly and pack them tightly like this.
  • Crush enough digestive biscuits, butter and 2 tbsp sugar in a blender to fill 1 loosely packed cup. This forms the base of the cake.
  • Spread the crushed biscuits in the cake tin and press it down firmly. Bake this for about 5-7 mins at 200 degrees Celsius so that it becomes a crisp, blended crust for the base.
  • Now, blend together the cream cheese, sugar, cornstarch, mango pieces and cardamom powder to form a thick, creamy mixture.
  • Spread this over the crust and put it in the oven for 30-35 minutes. 
  • Check once after 25 minutes to see if the cake has started browning at the edges. If it has, it is done. If not, let it cook for another 5-10 minutes. If you have a glass mould, you'll see how the cake develops a lovely darker colour on the top and remains light yellow in the middle.
My cake got a teeny tiny over-baked at certain areas because of the over temperatures being higher in certain areas in the oven. So this is NOT how it is supposed to look like. But, if this colour starts forming at the edges of your cake and your cake starts leaving the tin, that'd mean it is done. Plus, what is garnishing meant for if not to cover up for you? ;)
  • Pop the cake in the fridge to set for at least 3-5 hours.
  • After pulling it out of the fridge, garnish with mint leaves and mango slices. I went a bit further to use a technique I learnt from Junior Masterchef and garnished my cake with flowers. :P However, these were used purely for colour and are not edible.

And, it's ready to be eaten! Every bite of it tastes like a little piece of heaven, even if I do say so myself. ;)

Friday, March 30, 2012

English Love: Jacket Potatoes

It is no secret that ever since I've come back from England, I've been pining away to go back. So obviously, anything related to England gives me immense pleasure. Of course, I'm not going to start eating fish and chips for meals or sausages for breakfast. But something that I can definitely make and have is jacket potatoes.
Jacket Potatoes with Baked Beans
Jacket potatoes, like my mum said, are potatoes with jackets. (You're right. She doesn't care much for my attempts to bring the world in my kitchen.) Basically, they're potatoes with their skin on. It is something so unique to England and its pubs that everytime I even think of a jacket potato, I invariably picture myself sitting in an English pub (a particular one near Victoria coach station in London which once served me simply out-of-this-world jacket potatoes!)

Anyway. Yesterday, my cousin happened to be at home and since she is quite illiterate about world cuisine, I often take it upon me to educate her. Yesterday was the day for some English cuisine. Not that making jacket potatoes is rocket science. But hey, it's pretty darn amazing! :)

Preparation time: 5 minutes
Cooking time: 1-1.5 hours
Serves: 1 person

Ingredients:
1 large potato (And I mean really large. If not, then 2 smaller potatoes.)
Salt, to taste
Pepper, to taste
3-4 tbsp baked beans (I like Heinz and so, use that one. But, if you don't want to use canned stuff, you can easily make them at home as well.)
1 tsp Olive oil
1 tbsp butter (or more, if you want. :P)
Grated cheese (Cheddar goes brilliantly with this dish. However, if you don't find it or it is too expensive, just use any processed cheese. I made it at a short notice and hence, the only option for me was processed cheese. In Mumbai, you'll find Cheddar at Crawford Market or in any of the Nature's Basket outlets. Also, incidently, if anyone has tried the new Amul Cheddar, can I please have some reviews?)

Method:
If you notice carefully, you'll see where they have been poked with forks
  • Clean the potato thoroughly.
  • Prick the potato with fork several time so that it has an escape for all the pressure while it will be baked.
  • Coat the potato with olive oil and some sea-salt. (Sea-salt works better but if you don't have it, regular salt will also work just fine.)
  • Place it on a baking sheet and bake for about 60-75 minutes. (If you want to reduce the cooking time, cook the potatoes in the microwave for not more than 2 minutes first and then, you will only need to cook it in the oven for about 45 minutes. Don't overdo the cooking in the microwave. If it becomes soft even before it is put in the oven, the skin's flavour doesn't develop as well.)
  • After about 60 minutes (30 if you're using the microwave method), check if it's done using a fork or a knife. Prick the potato with the fork and if it is soft all the way, then it's done.
Potatoes out of the oven should look like these

  • Once out of the oven, carefully make 2 slits on the potato, making a plus (+) sign.The potato will be extremely hot. Be very, very careful. Hold the potato on both sides with a towel and make the slits.
Potatoes with the slits: fluffed with salt, pepper and butter
  • Open the potato along the slit-lines and with the help of a fork, fluff it up a bit.
  • Sprinkle salt and pepper, slide in the butter and cover with baked beans. 
  • Finally, top it up with the grated cheese. 
  • Serve immediately.

There are so many variation you can do with this and change it to suit your taste buds and palettes. For instance, you can top it up with spaghetti and carbonara (for the non-veggies) or spaghetti and tomato pasta sauce for an Italian taste; Mexican beans and spices for a South American taste, even chillies and curry for an Indian taste. 

One of the great toppings I've had is peppers and jalapenos sauteed in dark soy and chilli sauce. I tell you, I was in love!

Thursday, March 22, 2012

Back with a Salad!

Well, I guess it's time for me to return from my extremely long hibernation and start food-blogging again. So, here I am! Back with a bang! Err, Salad, I mean. ;)

Recently my father was diagnosed with a heart problem and after that, he had to stop being my partner in crime (of eating all the rich food that I make) and monitor his dietary habits. Plus, I was busy and my mother never favoured my sometimes too extravagant, sometimes too creepy-looking, sometimes too smelly, sometimes just wrong cooking. As a result, my culinary experiments came to a screeching halt for about 2-3 months. But, yesterday, I decided enough was enough. It may be her kitchen but she can't take away my guest visit rights forever!
So, I chalked out a health-food menu, which my father can have and which will tantalize my deprived taste-buds as well: Ratatouille with rice and a nice salad.

Rataouille recipe will follow at some point. But this salad - basically just a mix of all the fresh vegetables I had at hand - was so good, I actually regretted having cooked anything else at all! The colours and flavours blend so well that they leave you with a picture of a very inviting and a very healthy dish.


Preparation time: 20 minutes
Serves: 3 people (if served as an accompaniment and 1 person if it's for lunch and you're like me.)

Ingredients:

10-15 purple cabbage leaves, shredded
1/2 red pepper
1/2 yellow pepper
7-8 broccoli florets, steamed for 3-4 minutes
1 small tomato
a handful sweet corn, boiled until soft
10-12 peanuts, roasted (optional - I added them after my father had served himself)
2 tbsp flax seeds, roasted
1 tbsp olive oil
salt and pepper, to taste

Method:

  • Toss all the fresh vegetables (after treating them the way they have been described above), peanuts and flax seeds in a big salad bowl.
  • Just before serving, drizzle the olive oil and sprinkle salt and pepper on it. 
  • Toss well. (Click pictures. :P) Serve immediately.
Stay healthy, stay happy! Let me know how you used this recipe, how it turned out and what variations you used. :)

Saturday, August 7, 2010

Vegan Chocolate and Hazelnut Brownies

Ingredients:

5 tbsp margarine
1 cup cocoa powder (or dark chocolate bits)
3/4 cup brown sugar
1 cup plain flour
1/2 cup hazelnuts
1/2 chocolate chips
2 tbsp baking powder
1 cup water

Method:

  • Melt the margarine and cocoa powder/ dark chocolate bits together on very low flame. (It's better if you don't heat it directly and instead, melt them through steam boiling. Basically, in a pan, heat some water and over the boiling water, put another pan, in which you melt the margarine and cocoa powder/ dark chocolate bits.)
  • Once they have melted and mixed well, add brown sugar and mix well.
  • Take the pan off the heat and add all the other ingredients. Mix well until it forms a batter like cake batter, falling in folds.
  • Line a rectangle shallow cake tin with baking paper and pour the batter in it. Make sure that it is not concentrated only in certain places. If needed, level it out with a spoon.
  • Bake in a pre-heated oven for about 40-50 minutes.
  • As soon as it is done and you get it out of the oven, cut in square pieces. 
  • You may serve it just like that or with ice-cream and chocolate sauce.

Vegan Apple and Pecan Spice Cake

Ingredients:

2 cups plain flour
3/4 cups sugar
1 tsp nutmeg powder
1 tsp cinnamon powder
3 medium-sized apples, peeled and diced
1 tsp vanilla essence
1 tsp baking soda
2 tbsp baking powder
1-2 cups water
1/2 cup pecans

For Icing:

2 tbsp margarine
1 tsp cinnamon powder
1 tbsp sugar
1 tbsp fine icing sugar/ castor sugar


Method:

  • Pre-heat the oven at 150 degrees Celcius for about 30 minutes.
  • In a bowl, mix flour, sugar, baking soda, vanilla essence, nutmeg and cinnamon powders and pecans. Mix thoroughly.
  • Add baking powder and pour 2 tbsp water on the baking powder. Mix with the other dry ingredients.
  • Add the diced apples.
  • Pour the water slowly and keep mixing the batter. Pour enough water to make the cake batter fall in folds.
  • Grease and flour an 8 or a 9 inch cake tin. Pour the batter in the cake tin and bake for about 50 minutes. After 40 minutes, check with a fork or a skewer if the cake is done. 
  • Once it is done, let it cool for about 30 minutes and then, put it out on a plate.

For Icing:
  • In a bowl, melt the 2 tbsp on margarine.
  • Add the cinnamon and sugar. Mix well.
  • Using a pastry brush, glaze the cake with this mixture. 
  • Once it has cooled down, sprinkle some icing sugar/ castor sugar on the cake.


Variation: You may use any other nuts, like almonds, walnuts, brazil nuts, macademias, hazel nuts etc instead of pecans. You may also use butter instead of margarine if you are not a vegan and it'll make the crust richer.

Wednesday, June 30, 2010

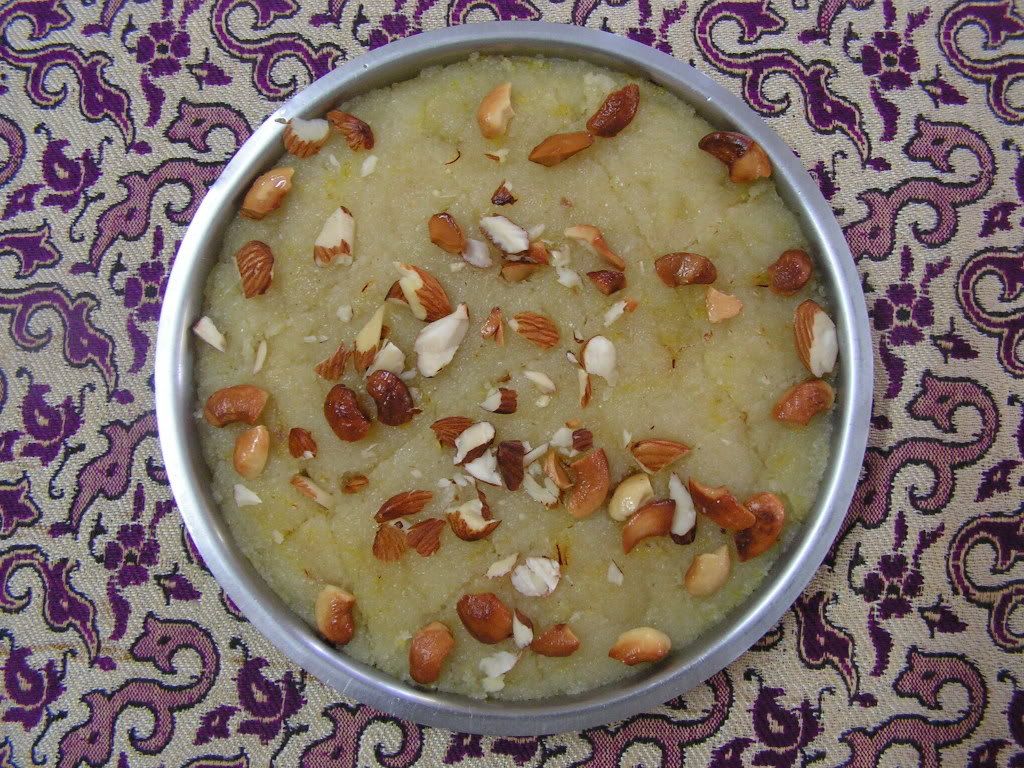
Sheera/ Sooji Halwa/ Semolina Halwa

Ingredients:

2 cups fine semolina (sooji/ rawa)
1 tbsp ghee
1.5-2 cups sugar
1.5 cups milk
1 tsp cardamom powder
7-8 almonds
7-8 cashews and raisins (optional)

Method:


  • Soak the almonds for an hour. Peel and slice them.
  • Heat the ghee in a pan. Roast the semolina in the ghee for 5-7 minutes until it becomes more ivory in colour rather than the white.
  • Pour the milk in the roasted semolina and stir well.
  • Let it cook for 3-4 minutes until it starts becoming sticky.
  • Add the sugar and stir well.
  • Add the cardamom powder, the sliced almonds and garnish with cashews and raisins, if wanted.
  • Serve hot.

Sunday, May 30, 2010

Rajma (Red Kidney Beans Curry)

Ingredients:

500 gms Red kidney beans
1 large onion
1 tomato
2-3 tbsp oil

Spices for tempering:
1 tsp cumin seeds
1 pinch asafetida (commonly known as hing)
1 tsp ginger paste
1 clove garlic
1/2 tsp turmeric

Spices for flavouring:
1 tbsp cumin powder
1 tsp coriander powder
1/2 tbsp Garam Masala
1/2 tbsp Chaat Masala
1 tbsp chilli powder
salt to taste
4-5 drops of lemon juice

Method:


  • Soak the kidney beans overnight.
  •  Boil them with some salt until soft (takes about 20-30 minutes in a pressure cooker and about 90-120 minutes in a pan.) Drain excess water and set aside. You may drain the water in another bowl and use the same for cooking later. This water contains a lot of nutrients from the beans. 
  • Chop onions and tomatoes finely. 
  • Heat the oil in a pan on medium flame (gas mark 3 or 4). When the oil is heated enough, add all the spices for tempering. 
  • Add onions and cook until they turn translucent. Keep stirring and tossing the mixture. 
  • Add the tomatoes and cook for another 2 minutes. 
  • Add the boiled kidney beans. Keep stirring. Cover and let it cook for another 2-3 minutes. 
  • Add all the spices for flavouring and stir well. 
  • Add 1/2 cup of water, cover and let it cook for 7-8 minutes. Keep stirring every couple of minutes.
  • Garnish with coriander/ sliced tomatoes/ sliced onions/ grated coconut. (optional) 
  • Serve hot with roti/ paratha/ nan bread/ rice.